

How to Add Connected Cameras to the Factory Floor
December 14, 2018

In our last post, we discussed how cameras can add value for Training, Quality Monitoring, and Remote Monitoring/Compliance in manufacturing environments. As we heard in a recent discussion with a prospect, cameras are a great way to capture “institutional knowledge” that often isn’t housed elsewhere in documents or otherwise written down. A small investment in cameras can help to capture that information and document process conditions that will be invaluable for future reference, at a minimum. So the next step, if these needs apply to your facility, is – how do I get started?
What You’ll Need for Your Camera Solution
Even if you don’t have cameras on hand to repurpose as suggested in the Cisco post we referenced, the rise in availability and drop in cost for connected cameras, like the Raspberry Pi camera module, makes it easy and affordable for every organization to deploy cameras on the factory floor. You’ll probably want to start with a simple deployment of a small number of cameras on one production line before rolling out your solution throughout the factory.
Your cameras will need to be networked – wirelessly in the case of the Raspberry Pi. You may be able to leverage existing network infrastructure as a first step, but over time, you’ll likely want to think about adding a factory-specific wireless router or upgrading your existing network for better support.
If this all seems complicated, it doesn’t have to be. To get started, we’ve pulled together these basic instructions on your shopping list, Raspberry Pi camera set-up, and installation of Corlina and your gateway.
Let’s start with all the particulars on the cameras themselves.
The Raspberry Pi Cameras
Purchasing Your Camera(s) and Related Equipment
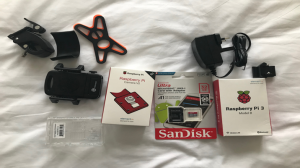
Here is the equipment you’ll need to purchase on Amazon; you’ll need one of each per camera installation.
| Amazon Shopping List | Price & Details |
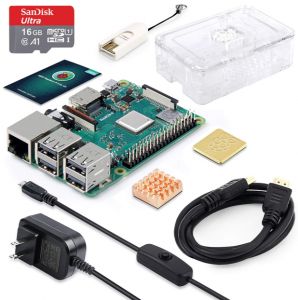 |
ABOX Raspberry Pi 3 B+ Complete Starter Kit (Current U.S. cost on Amazon: $69.99) Kit includes:
|
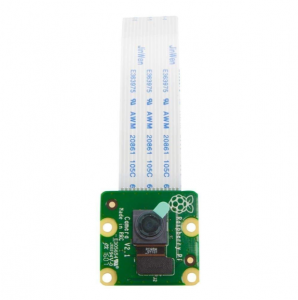 |
Raspberry Pi Camera Module v2 8 Megapixel, 1080p (Current cost on Amazon: $24.90) |
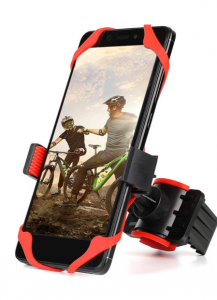 |
iKNOWTECH Adjustable Bike Phone Holder (Current cost on Amazon: $7.99)Yes, this is what we really mean to recommend! Enables you to attach your camera to a round pole at your manufacturing station. See more on this below. In addition to this setup, you may also consider using zip ties to further secure your cameras to the mount. |
Total Cost of Each Camera Set-up (U.S.): $102.88 + tax
You have some flexibility on which bundles to purchase and where you purchase them, but we’ve stuck with Amazon to keep things simple. You may end up with multiple shipments, but you can find and track all your purchases in one place.
Assembling the Camera Hardware
The first step once you receive all your items will be to assemble the cameras.
- Insert the Pi board into the base part of the case.
- The camera module clips into the top part of the case and the ribbon cable is put into the Pi board. You may also want to install one of the included heat sinks.
- Clip the 2 parts of the case together.
- Finally put the micro SD card into the Pi.
Setting up the Pi/Camera Software
The kit comes with an SD card that already has the initial OS called NOOBS. Plug in the power lead and add in a screen, keyboard and mouse; this will make initial configuration easier.
This is the software panel that comes up:
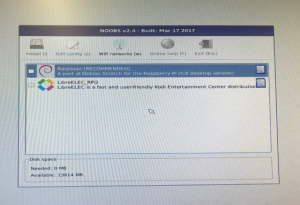
At the top of the page, you’ll see a WiFi tab. Click on this and follow the instructions to connect the Raspberry Pi to your factory WiFi network.
Once you connect to the Internet, the Pi will present a list of software for installation:
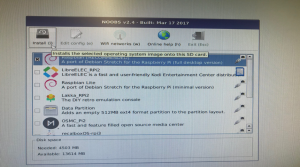
Check the box for Raspbian (not Raspbian Lite) and click Install.
This will download and install the full Debian Raspberry Pi OS. It will overwrite the SD card, but this is fine. The Install takes about 20 minutes.
Once the Raspberry Pi has the new OS installed, then the first screen will show the Raspberry Pi logo in the top left. Click on the logo and go to preferences.
- Step one is to update the password. It may make sense to have the same password for all of the Raspberry Pis in the factory; use your discretion here but make sure to use a secure password.
- Step 2 is to go to the interfaces tab and enable Camera & SSH access. The Pi will now request a reboot, so go ahead and reboot.
Repeat this process for the other Pis if you’re installing multiple cameras.
Setting Up the Pi Camera
Before finalizing the camera position at your workstations, you’ll need to set-up the camera hardware and software. Then to capture video, stream it to the appropriate device (your phone, tablet or PC), and package files for storage, you’ll want to add an application like motionEye. This is a great, open source app that is designed to work on the Raspberry Pi, simplifying the process of capturing relevant video and making it viewable where you need it. With integrations with Google Drive and Dropbox, it also eases the process of storing the videos you’ll want to retain for your records and training purposes.
Follow the instructions to install motionEye on your Pi. (Make sure to follow the instructions for Raspbian OS.) You’ll want to make sure you follow the instructions on the motionEye GitHub repository. While there is other information out on the Web about using motionEye, we’ve found that some references are not reliable.
Once you’ve got all this configured, you can move on to the final steps.
Positioning the Pi(s) In the Factory
The Pi video can now be accessed remotely so you can position the Pi in the factory. (Make sure the computer that you’ll be using to manage your cameras is connected to the same wireless network as your Raspberry Pis.)
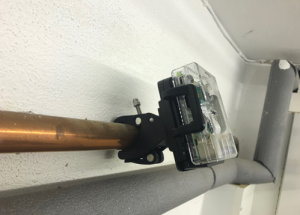
Here is an example of the Raspberry Pi using the bike mounting kit. The mount is similar to that used by Hitachi High Tech in Thailand and is for a round pole.
You’ll need to experiment with adjusting the angle and position of the camera to ensure you’re capturing the activity you are planning to track and record.
Ok, almost there!
System Monitoring and Protection
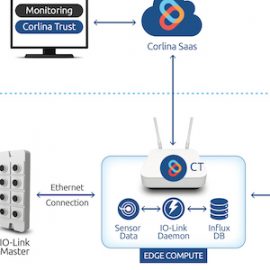
Last but not least, at this point you must consider how you’ll monitor and maintain the integrity or your cameras and video, as well as ensuring their security. Corlina provides an easy way to safely on-board new devices onto the factory floor, monitor and manage their performance, and ensure their trustworthy operation with immediate notifications to changes or tampering that could occur on the factory floor. To get started with Corlina, you can sign up for our free 30-day trial and install Corlina on your cameras and other devices running on Linux by stepping through our easy onboarding process.
Need More Help?
Let us know if you get started and have questions! We can provide help. Email us at support@corlina.com.
Depending on the questions we receive, we’ll be adding another post with more on advanced video set-up, so please let us know your thoughts.
Read the first post in this blog series, “First Promise, Then Pain, Now a Path Forward”, on taking a simpler approach to implementing IIoT projects.
Related articles

We were very excited to learn on Friday that the Corlina System of Trust has received a 2019 IoT Evolution Industrial IoT Product of the Year Award from IoT Evolution World, the leading magazine and Web site covering IoT technologies. It’s very exciting when your product receives this type of

In our recent articles, we’ve talked about taking a different approach to embarking on building IIoT capabilities, one that protects organizations from pilot purgatory by focusing on a specific challenge in the manufacturing environment and yielding ROI quickly. It’s not a rip-and-replace method requiring massive investments in new equipment. It’s
Solution Overview Corlina’s brownfield monitoring solution blueprint is intended to enable monitoring and decision-making based on information captured from already-in-place equipment. These existing systems are often implemented on closed architectures and/or closed data buses for reliability reasons, or they may not include any embedded sensors whatsoever. Corlina provides a cost-effective