

A Blueprint for Implementing IIoT in a Brownfield Facility: Part 3
February 1, 2019

Implementing Your Brownfield IIoT Solution
Now that you’ve determined which brownfield systems you’ll be monitoring to arrive at your solution configuration and purchased all your solution components, you’re ready to move forward with implementation. We’ve broken down the installation into three main steps:
- Understanding the skills required for end-to-end set-up
- Preparing the environment for install, including locating all items and setting up power supplies and network connections, and
- Installing the software and starting up the system.
We recommend that you review all the steps in advance, so you’ll be prepared for each task that is required.
Let’s get into the details!
1. Skills List
In order to implement the solution on your site, you’ll want to have access to the following skills for implementation:
- A licensed electrician – for setting up the power supply to your IO-Link master
- A mechanic – to mount your sensors securely on the equipment you will be monitoring
- A network cabling specialist – to ensure appropriate physical connectivity of devices
- A network admin – to establish an IP address for your Edge Compute device
- A Linux-Unix specialist – for setting up your Edge Compute device
We’ve noted these skills in the order that they’ll be required when you walk through all the items on the checklists below. You may have these skills in house, but not all small- to medium-sized manufacturers do.
2. Preparing Your Environment
Your next step once all your equipment has arrived and you have the skilled personnel you’ll need, is to prepare your production environment for installation and set-up. These preparation steps include setting up your power supplies, preparing mounting for sensors, and ensuring your network connectivity is ready to support your roll out.
☐ Determine location for Edge Compute device and each IOLM
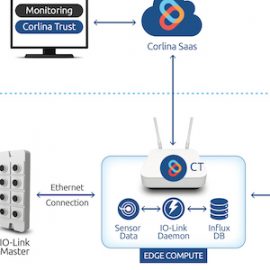
You will need to determine where the Integration Server and each IOLM will be located for ongoing operations. This will determine where power and network connectivity must be provided. If you have a server room or central office, that may be the ideal location for your Edge Compute PC provided that you have good network connectivity available. Your IOLM(s) will need to be located near your sensors and an Ethernet connection.
☐ Wire and mount power supply for each IOLM
This step includes mounting the power supply, wiring the transformer directly into an electrical line, and connecting to the IOLM. This step requires support from a licensed electrician. You can access detailed instructions here.
☐ Network connectivity and prep
The solution requires an Ethernet connection for each IOLM and the Integration Server. We recommend 100 Base-T or better for each. And because the Edge Device will need to share trust data with the Corlina SaaS, traffic may need to be segmented to ensure that operational data is isolated from the Internet. Read more here.
☐ Determine mounting points and mount sensors and IO-Link master devices
This step includes determination of the appropriate mounting hardware to ensure secure placement during ongoing operations.
☐ Set up the IO-Link interface
Configuration of the IO-Link master and any sensors to be attached to it should be accomplished using the USB point to point interface provided by the ifm E30390 USB IO-Link Master connected to a Windows (or Windows VM) via USB.
☐ Configure sensors and set logical names
For sensor configuration, we recommend referring to the manufacturer documentation for installation of each sensor: for the JN2200 and for the TA2002. Once they are configured, set the logical names and collect serial numbers.
☐ Determine temperature and vibrational threshold values
- The temperature is a Celsius value for where we would want to send out warnings for temperatures that exceed acceptable levels. (Each of the 4 sensors can have its own threshold.)
- The vibrational thresholds are two numbers: the acceleration of the sensor in milli-gravities (accurate to 2 decimals) and the velocity of the sensor in millimeters per second.
Because you may not have a good reference point for setting these thresholds, we recommend that you set up your solution and track values for the first 2 weeks to establish a normal operating range.
3. Solution Installation
☐ Install Ubuntu Linux (or confirm factory install)
☐ Set up ssh or VNC
☐ Confirm Java Runtime Environment is present and active on Linux Java
☐ Install PyCharm Community Edition for debugging
☐ Install Archive Manager (File Roller) on Ubuntu
☐ Confirm Python 3.5 or higher is present, create Python virtual environment, and install required Python modules
☐ Back-up the installation to USB using sbackup
☐ Install Influx
☐ Set up Chronograf rendering server for graphical display of monitoring time-series data
☐ Set up Corlina
- Establish network access to the Corlina SaaS dashboard
- Create account
- Download and install agent
- Set up factory
- See Getting Started for more details
☐ Set logical names for sensors and collect serial numbers
☐ Install monitoring daemon
- Copy over zip file and unpack
- Set daemon owner to root and root group
☐ Set temperature and vibrational threshold values
Running Your Solution
Great work!
From here, you’ll be up and running, monitoring your system and guaranteeing that it’s performing as you expect.
If you’d like to follow this process again, we’ll be producing this checklist as a pdf for easier reference and use. Please subscribe to the Corlina blog if you’d like to be notified when this is available.
As always, don’t hesitate to let us know if you have questions, comments, or suggestions by contacting us at support@corlina.com.
Related articles

We were very excited to learn on Friday that the Corlina System of Trust has received a 2019 IoT Evolution Industrial IoT Product of the Year Award from IoT Evolution World, the leading magazine and Web site covering IoT technologies. It’s very exciting when your product receives this type of

In our recent articles, we’ve talked about taking a different approach to embarking on building IIoT capabilities, one that protects organizations from pilot purgatory by focusing on a specific challenge in the manufacturing environment and yielding ROI quickly. It’s not a rip-and-replace method requiring massive investments in new equipment. It’s
Solution Overview Corlina’s brownfield monitoring solution blueprint is intended to enable monitoring and decision-making based on information captured from already-in-place equipment. These existing systems are often implemented on closed architectures and/or closed data buses for reliability reasons, or they may not include any embedded sensors whatsoever. Corlina provides a cost-effective